Get started
Swipies AI is an open-source RAG (Retrieval-Augmented Generation) engine based on deep document understanding. When integrated with LLMs, it is capable of providing truthful question-answering capabilities, backed by well-founded citations from various complex formatted data.
This quick start guide describes a general process from:
- Starting up a local Swipies AI server,
- Creating a dataset,
- Intervening with file parsing, to
- Establishing an AI chat based on your datasets.
We officially support x86 CPU and Nvidia GPU, and this document offers instructions on deploying Swipies AI using Docker on x86 platforms. While we also test Swipies AI on ARM64 platforms, we do not maintain Swipies AI Docker images for ARM.
If you are on an ARM platform, follow this guide to build a Swipies AI Docker image.
Prerequisites
- CPU ≥ 4 cores (x86);
- RAM ≥ 16 GB;
- Disk ≥ 50 GB;
- Docker ≥ 24.0.0 & Docker Compose ≥ v2.26.1.
- gVisor: Required only if you intend to use the code executor (sandbox) feature of Swipies AI.
If you have not installed Docker on your local machine (Windows, Mac, or Linux), see Install Docker Engine.
Start up the server
This section provides instructions on setting up the Swipies AI server on Linux. If you are on a different operating system, no worries. Most steps are alike.
- Ensure
vm.max_map_count≥ 262144.
Expand to show details:
vm.max_map_count. This value sets the maximum number of memory map areas a process may have. Its default value is 65530. While most applications require fewer than a thousand maps, reducing this value can result in abnormal behaviors, and the system will throw out-of-memory errors when a process reaches the limitation.
Swipies AI v0.22.1 uses Elasticsearch or Infinity for multiple recall. Setting the value of vm.max_map_count correctly is crucial to the proper functioning of the Elasticsearch component.
- Linux
- macOS
- Windows
1.1. Check the value of vm.max_map_count:
$ sysctl vm.max_map_count
1.2. Reset vm.max_map_count to a value at least 262144 if it is not.
$ sudo sysctl -w vm.max_map_count=262144
This change will be reset after a system reboot. If you forget to update the value the next time you start up the server, you may get a Can't connect to ES cluster exception.
1.3. To ensure your change remains permanent, add or update the vm.max_map_count value in /etc/sysctl.conf accordingly:
vm.max_map_count=262144
If you are on macOS with Docker Desktop, run the following command to update vm.max_map_count:
docker run --rm --privileged --pid=host alpine sysctl -w vm.max_map_count=262144
This change will be reset after a system reboot. If you forget to update the value the next time you start up the server, you may get a Can't connect to ES cluster exception.
To make your change persistent, create a file with proper settings:
1.1. Create a file:
sudo nano /Library/LaunchDaemons/com.user.vmmaxmap.plist
1.2. Open the file:
sudo launchctl load /Library/LaunchDaemons/com.user.vmmaxmap.plist
1.3. Add settings:
<?xml version="1.0" encoding="UTF-8"?>
<!DOCTYPE plist PUBLIC "-//Apple//DTD PLIST 1.0//EN" "http://www.apple.com/DTDs/PropertyList-1.0.dtd">
<plist version="1.0">
<dict>
    <key>Label</key>
    <string>com.user.vmmaxmap</string>
    <key>ProgramArguments</key>
    <array>
        <string>/usr/sbin/sysctl</string>
        <string>-w</string>
        <string>vm.max_map_count=262144</string>
    </array>
    <key>RunAtLoad</key>
    <true/>
</dict>
</plist>
1.4. After saving the file, load the new daemon:
sudo launchctl load /Library/LaunchDaemons/com.user.vmmaxmap.plist
If the above steps do not work, consider using this workaround, which employs a container and does not require manual editing of the macOS settings.
If you are on Windows with Docker Desktop, then you must use docker-machine to set vm.max_map_count:
$ docker-machine ssh
$ sudo sysctl -w vm.max_map_count=262144
If you are on Windows with Docker Desktop WSL 2 backend, then use docker-desktop to set vm.max_map_count:
1.1. Run the following in WSL:
$ wsl -d docker-desktop -u root
$ sysctl -w vm.max_map_count=262144
This change will be reset after you restart Docker. If you forget to update the value the next time you start up the server, you may get a Can't connect to ES cluster exception.
1.2. If you prefer not to run those commands every time you restart Docker, you can update your %USERPROFILE%.wslconfig as follows to keep your change permanent and global for all WSL distributions:
[wsl2]
kernelCommandLine = "sysctl.vm.max_map_count=262144"
This causes all WSL2 virtual machines to have that setting assigned when they start.
If you are on Windows 11 or Windows 10 version 22H2, and have installed the Microsoft Store version of WSL, you can also update the /etc/sysctl.conf within the docker-desktop WSL distribution to keep your change permanent:
$ wsl -d docker-desktop -u root
$ vi /etc/sysctl.conf
# Append a line, which reads:
vm.max_map_count = 262144
-
Clone the repo:
$ git clone https://github.com/infiniflow/ragflow.git
$ cd ragflow/docker
$ git checkout -f v0.22.1 -
Use the pre-built Docker images and start up the server:
# Use CPU for DeepDoc tasks:
$ docker compose -f docker-compose.yml up -d<APITable>Swipies AI image tag Image size (GB) Stable? v0.22.1 ≈2 Stable release nightly ≈2 Unstable nightly build </APITable>NOTEThe image size shown refers to the size of the downloaded Docker image, which is compressed. When Docker runs the image, it unpacks it, resulting in significantly greater disk usage. A Docker image will expand to around 7 GB once unpacked.
-
Check the server status after having the server up and running:
$ docker logs -f docker-ragflow-cpu-1The following output confirms a successful launch of the system:
     ____   ___    ______ ______ __
    / __ \ /   |  / ____// ____// /____  _      __
   / /_/ // /| | / / __ / /_   / // __ \| | /| / /
  / _, _// ___ |/ /_/ // __/  / // /_/ /| |/ |/ /
 /_/ |_|/_/  |_|\____//_/    /_/ \____/ |__/|__/

* Running on all addresses (0.0.0.0)IMPORTANTIf you skip this confirmation step and directly log in to Swipies AI, your browser may prompt a
network anomalyerror because, at that moment, your Swipies AI may not be fully initialized. -
In your web browser, enter the IP address of your server and log in to Swipies AI.
WARNINGWith the default settings, you only need to enter
http://IP_OF_YOUR_MACHINE(sans port number) as the default HTTP serving port80can be omitted when using the default configurations.
Configure LLMs
Swipies AI is a RAG engine and needs to work with an LLM to offer grounded, hallucination-free question-answering capabilities. Swipies AI supports most mainstream LLMs. For a complete list of supported models, please refer to Supported Models.
Swipies AI also supports deploying LLMs locally using Ollama, Xinference, or LocalAI, but this part is not covered in this quick start guide.
To add and configure an LLM:
-
Click on your logo on the top right of the page > Model providers.
-
Click on the desired LLM and update the API key accordingly.
-
Click System Model Settings to select the default models:
- Chat model,
- Embedding model,
- Image-to-text model,
- and more.
Some models, such as the image-to-text model qwen-vl-max, are subsidiary to a specific LLM. And you may need to update your API key to access these models.
Create your first dataset
You are allowed to upload files to a dataset in Swipies AI and parse them into datasets. A dataset is virtually a collection of datasets. Question answering in Swipies AI can be based on a particular dataset or multiple datasets. File formats that Swipies AI supports include documents (PDF, DOC, DOCX, TXT, MD, MDX), tables (CSV, XLSX, XLS), pictures (JPEG, JPG, PNG, TIF, GIF), and slides (PPT, PPTX).
To create your first dataset:
-
Click the Dataset tab in the top middle of the page > Create dataset.
-
Input the name of your dataset and click OK to confirm your changes.
You are taken to the Configuration page of your dataset.
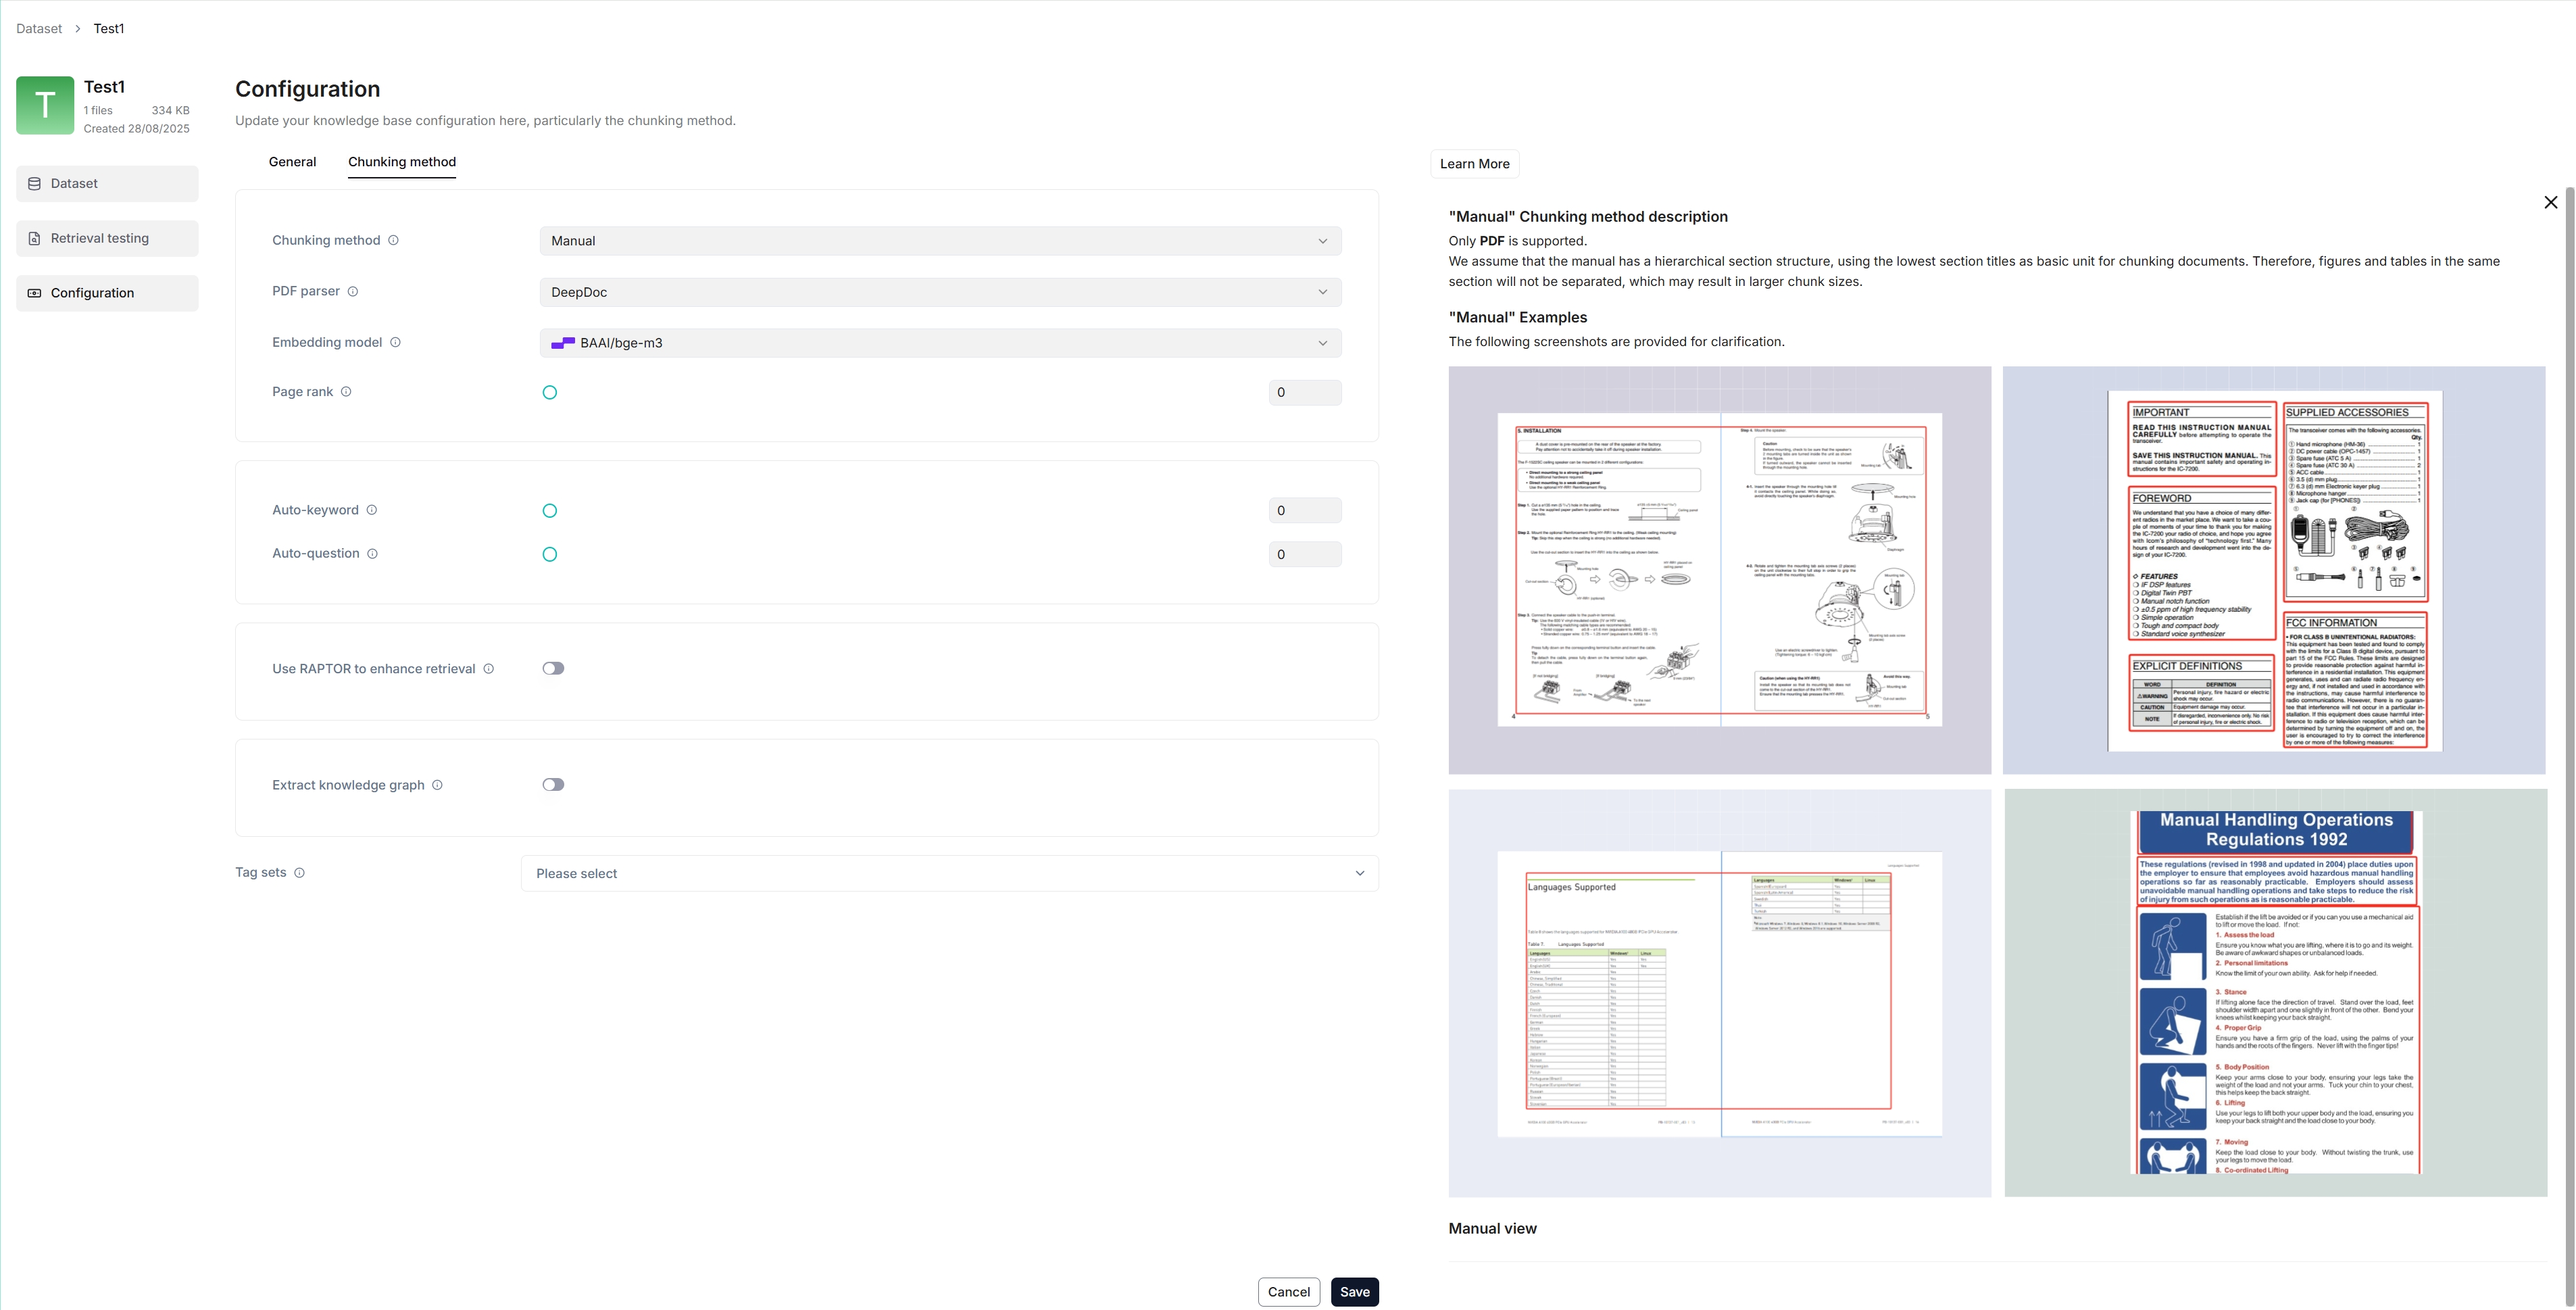
-
Swipies AI offers multiple chunk templates that cater to different document layouts and file formats. Select the embedding model and chunking method (template) for your dataset.
IMPORTANTOnce you have selected an embedding model and used it to parse a file, you are no longer allowed to change it. The obvious reason is that we must ensure that all files in a specific dataset are parsed using the same embedding model (ensure that they are being compared in the same embedding space).
You are taken to the Dataset page of your dataset.
-
Click + Add file > Local files to start uploading a particular file to the dataset.
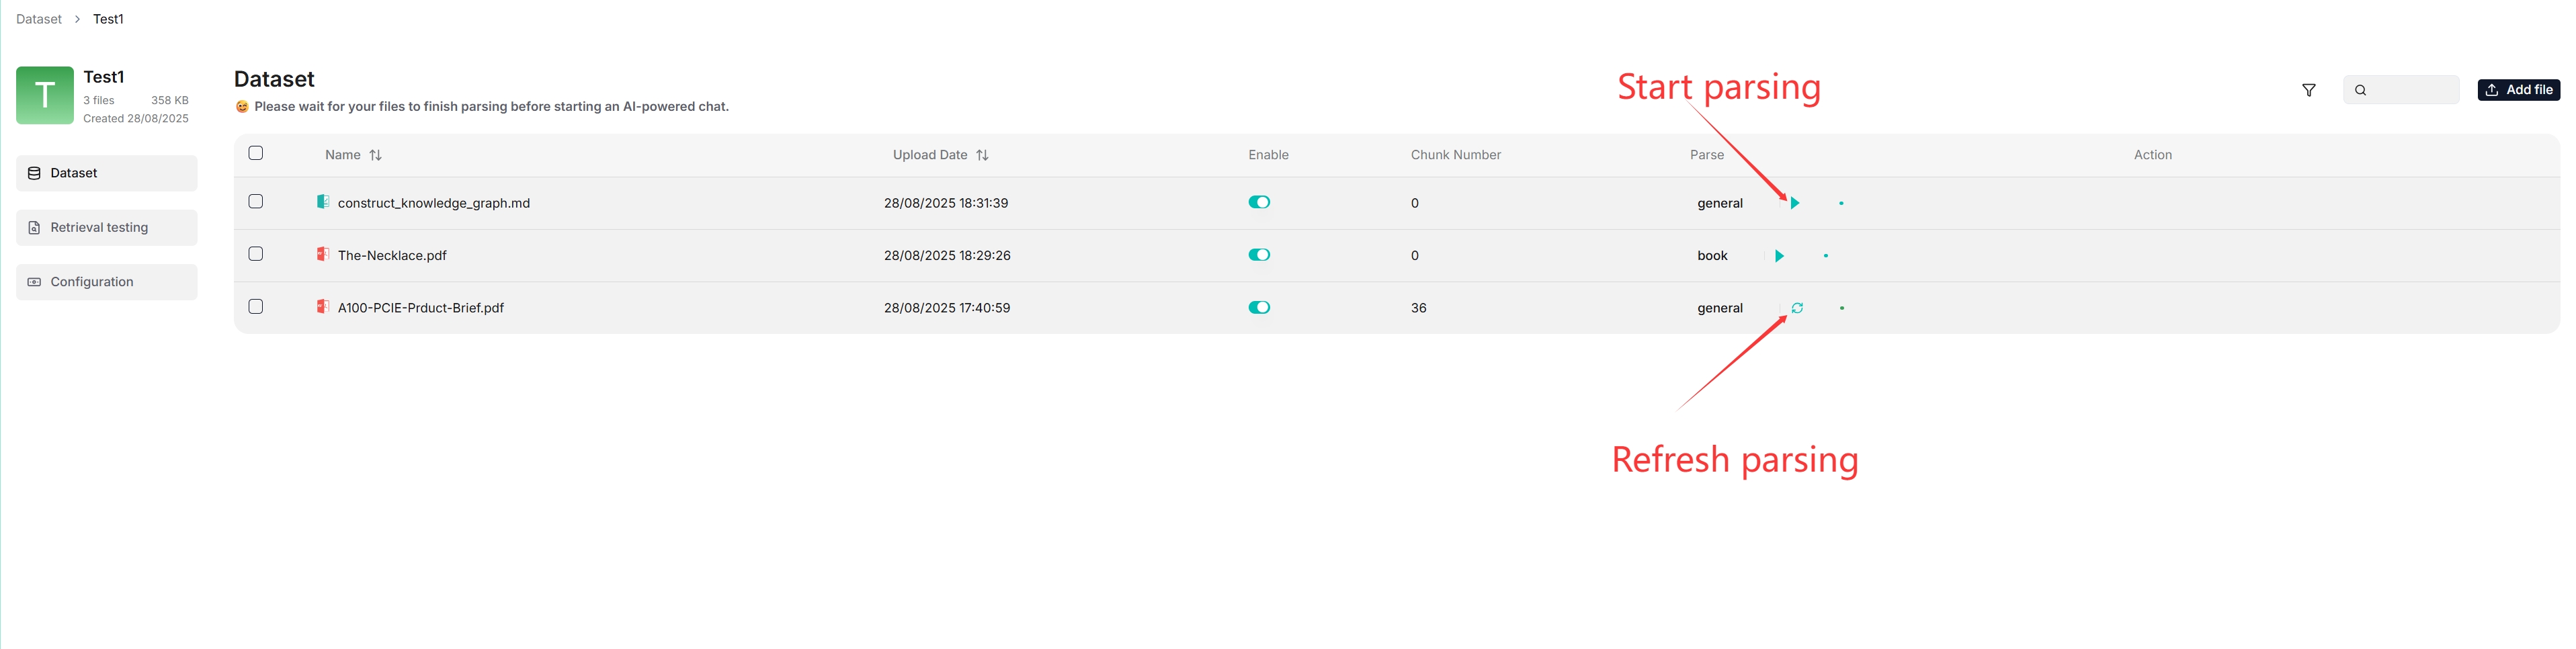
-
In the uploaded file entry, click the play button to start file parsing:
Intervene with file parsing
Swipies AI features visibility and explainability, allowing you to view the chunking results and intervene where necessary. To do so:
-
Click on the file that completes file parsing to view the chunking results:
You are taken to the Chunk page:

-
Hover over each snapshot for a quick view of each chunk.
-
Double click the chunked texts to add keywords or make manual changes where necessary:
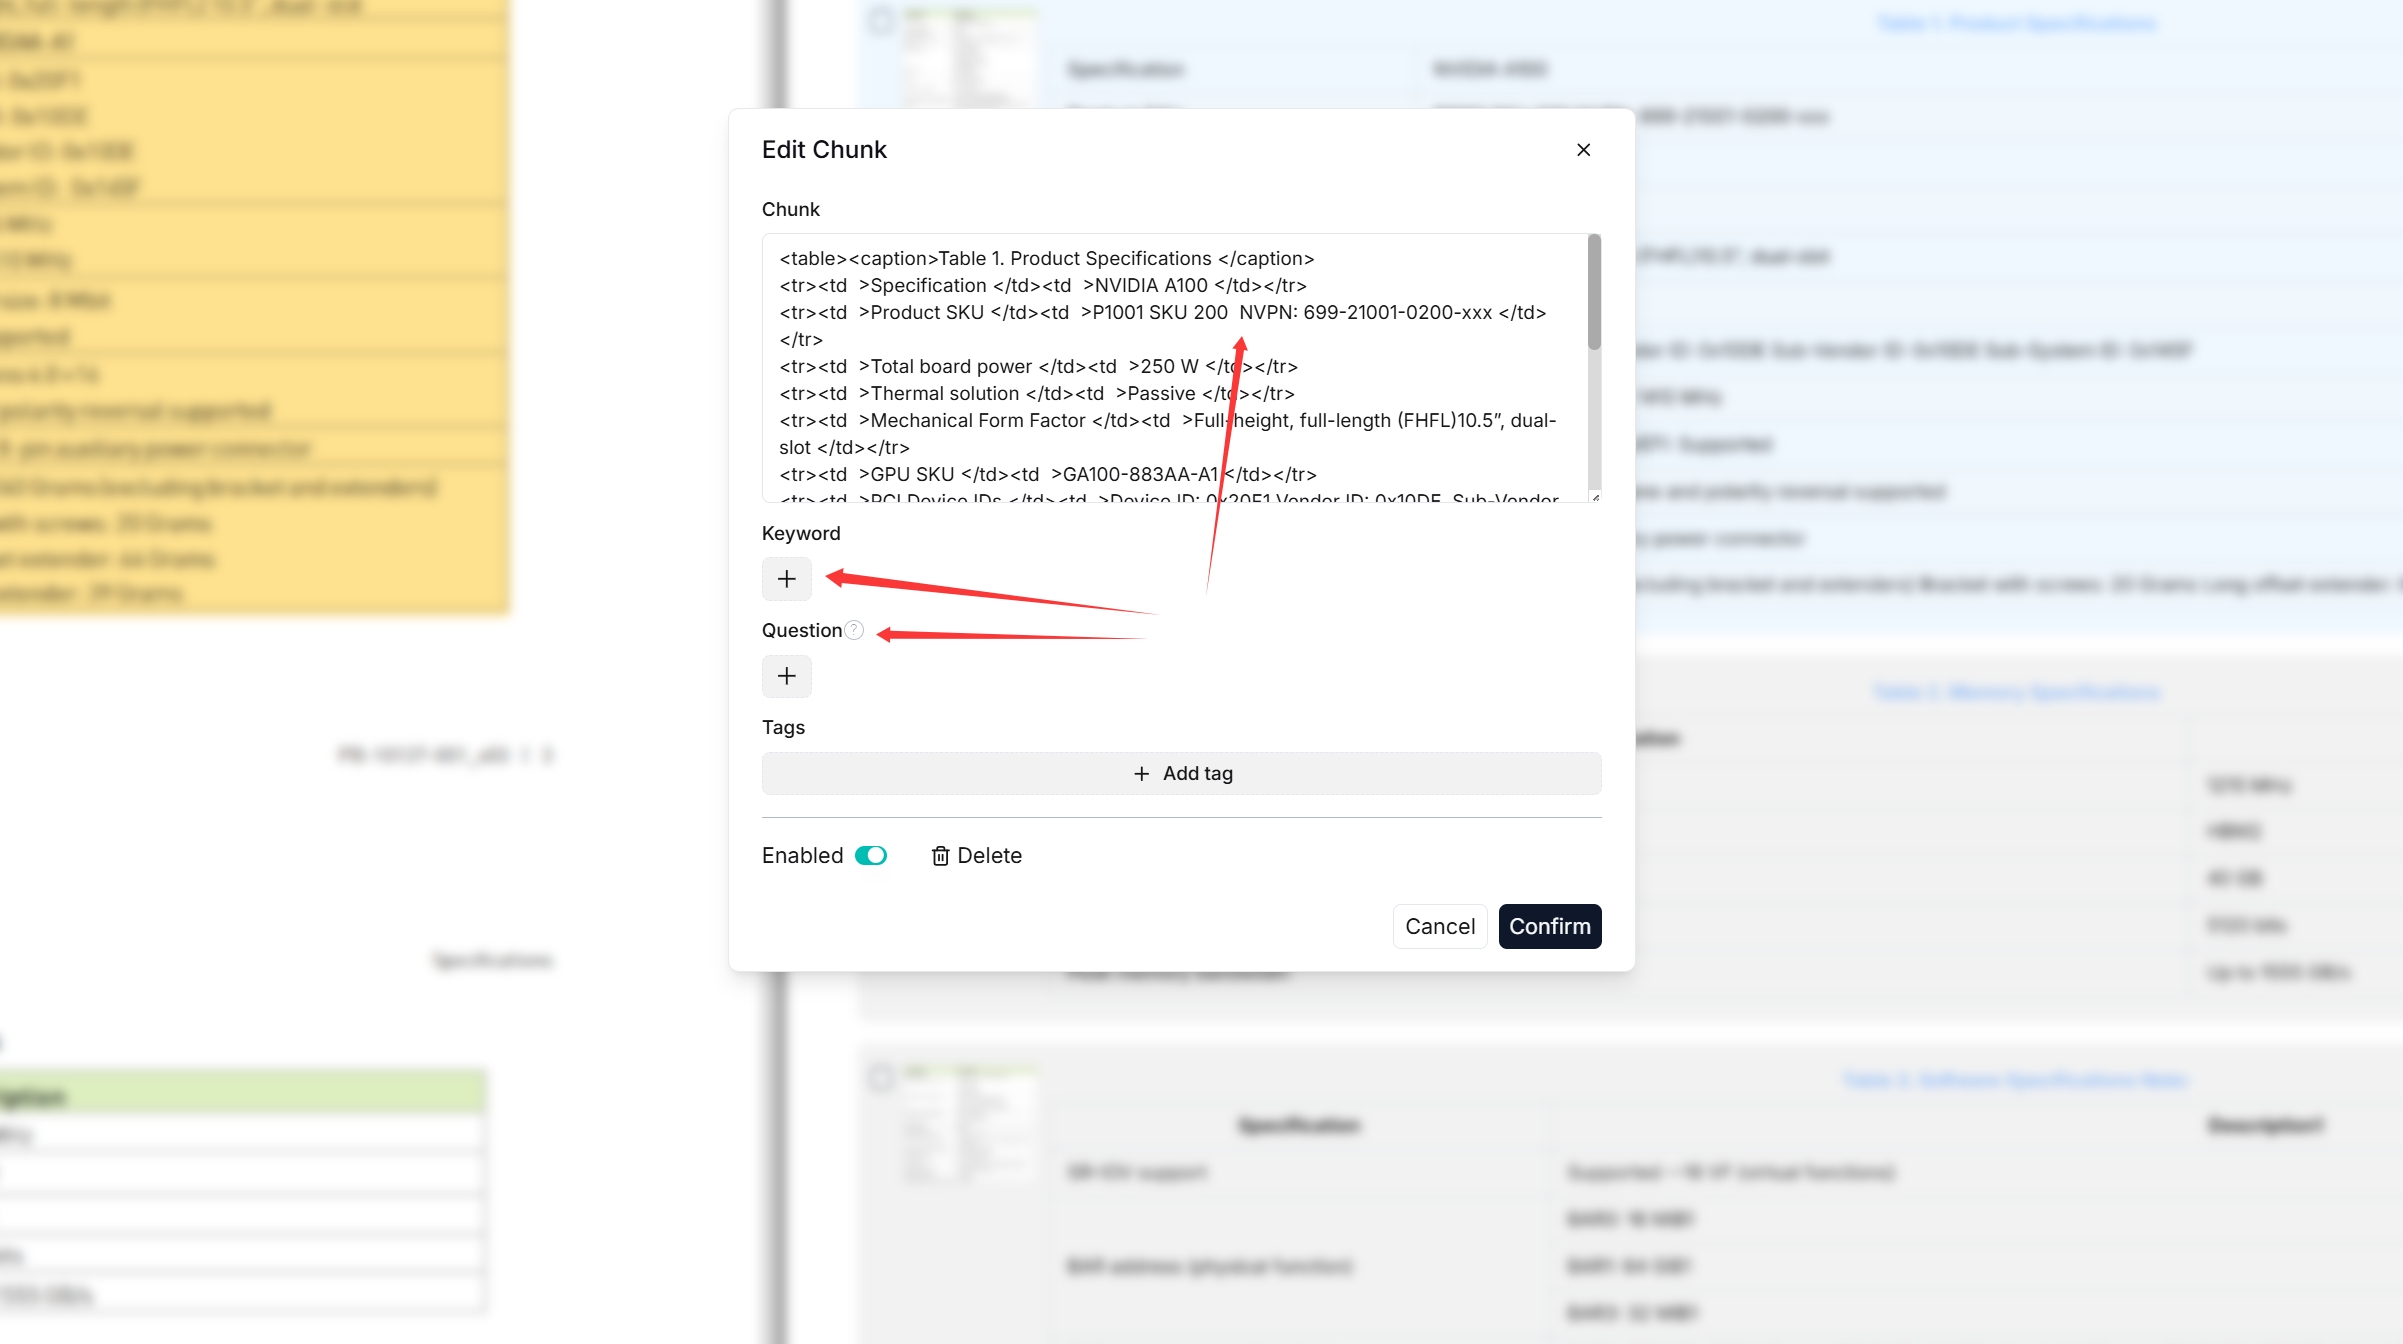 NOTE
NOTEYou can add keywords or questions to a file chunk to improve its ranking for queries containing those keywords. This action increases its keyword weight and can improve its position in search list.
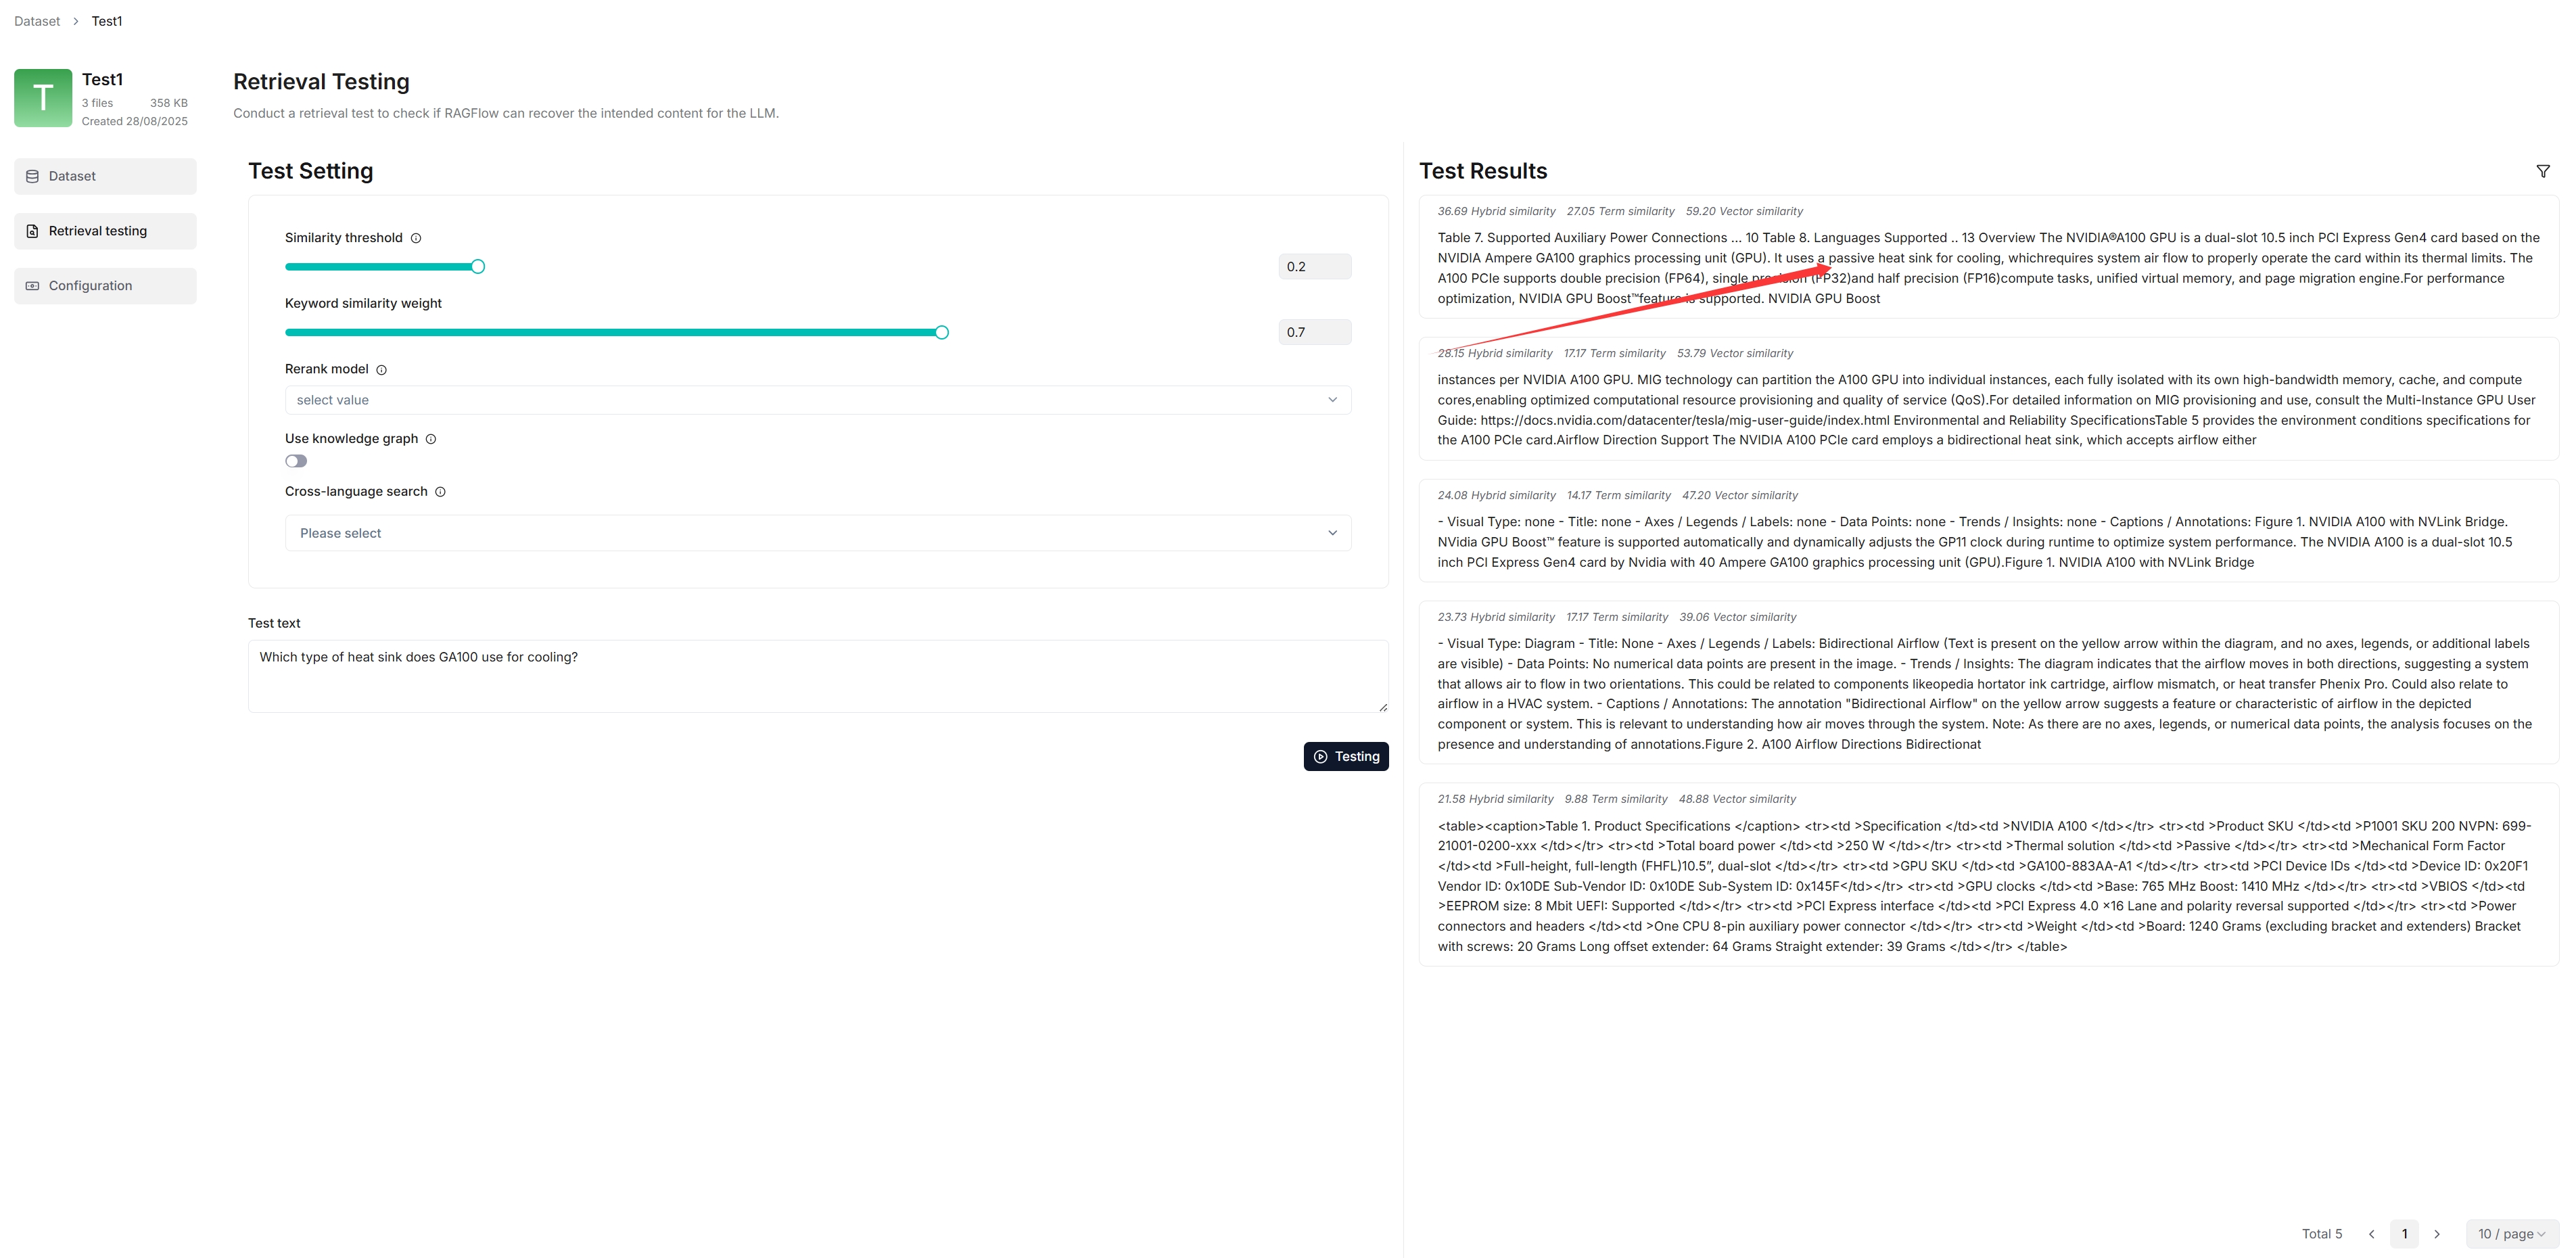
-
In Retrieval testing, ask a quick question in Test text to double check if your configurations work:
As you can tell from the following, Swipies AI responds with truthful citations.
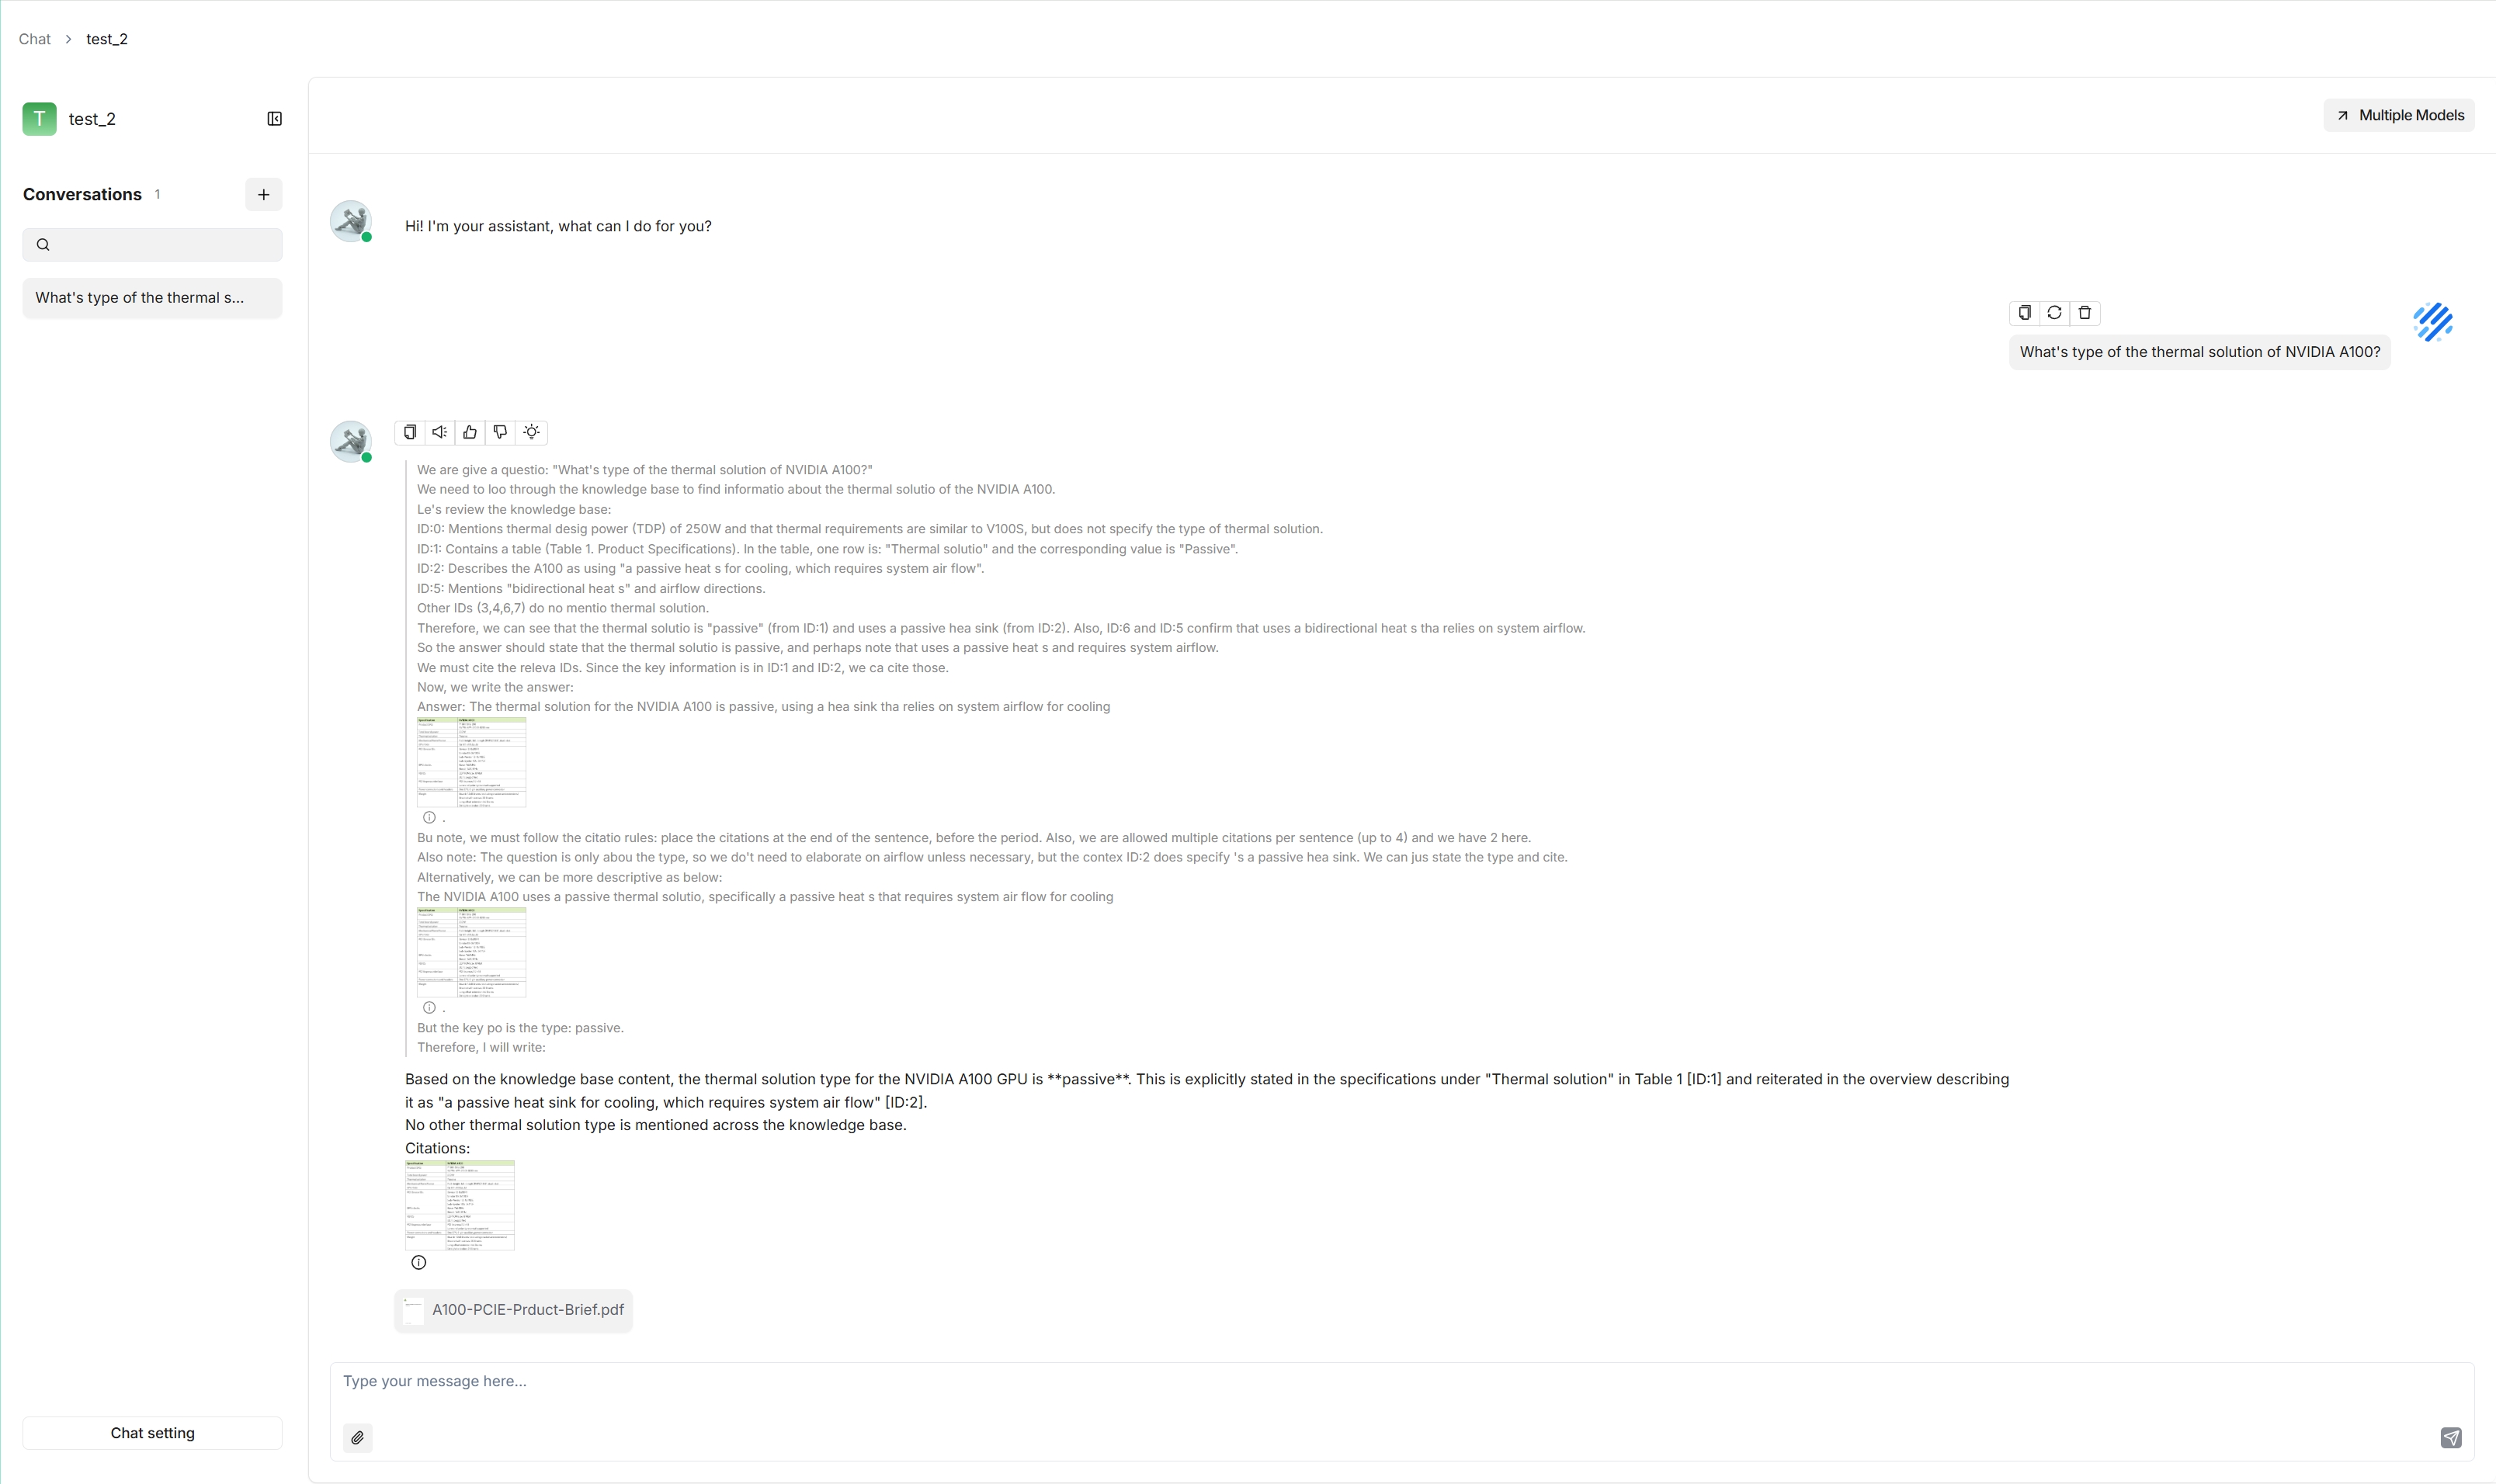
Set up an AI chat
Conversations in Swipies AI are based on a particular dataset or multiple datasets. Once you have created your dataset and finished file parsing, you can go ahead and start an AI conversation.
-
Click the Chat tab in the middle top of the page > Create chat to create a chat assistant.
-
Click the created chat app to enter its configuration page.
Swipies AI offer the flexibility of choosing a different chat model for each dialogue, while allowing you to set the default models in System Model Settings.
Swipies AI also offers HTTP and Python APIs for you to integrate Swipies AI's capabilities into your applications. Read the following documents for more information: